New addition to Workshop Tools

I’ve had my 8″ Grizzly Jointer for about 11 years and I love it.  At 8″ wide and 75″ long, it does a good job of flattening practically any board I’ve thrown at it.  However, the one thing I don’t enjoy is sharpening and re-aligning the long blades in the cutter head.  Each blade is 8″ long and there are 4 of them.  To get the best finish, all of the blades have to be perfectly aligned to each other, as well as aligned to the outfeed table bed.  This process can take hours, between sharpening, aligning, checking, re-aligning, and re-checking.

Normally I don’t have to do it very often, but I’ve been using a lot of very hard wood and plywood lately and these really ‘eat’ blades.  Consequently, it seems that the jointer always needed resharpening – and, because it was such a nuisance, I generally put off this step for much longer than I should have – and curse the resulting tearouts when I did push it too far.

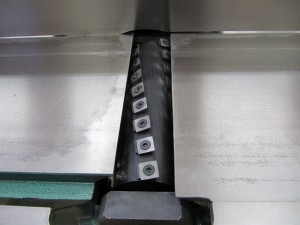
Well, to address this problem and attempt to get an even better finish off of the jointer, I’ve bit the bullet and replaced the original cutter head with a Byrd ‘Shelix’ cutter head.  As you can see, this cutter has individual carbide cutters that are arranged in a helix type of layout.

Click to view larger image.

Closeup of Helix Cutter.

Each blade is slightly skewed along the helix angle to provide a shear type of cutting action.  Each blade also has four cutting sides so that, as they become dull or nicked, they can be turned up to three times before replacing them.  AND, since they are individual cutters, replacing a nicked or worn blade is a simple matter of unscrewing it, putting in a new one, and screwing the new one down.  Of course, if ALL the blades need replacing then that has to be done 40 times!  However, the way the jointer is used, it’s most likely that only a subset need to be replaced at a time.  Oh, I should mention that, being Carbide, these blades will stay sharper longer that the high speed steel used in the older blades!

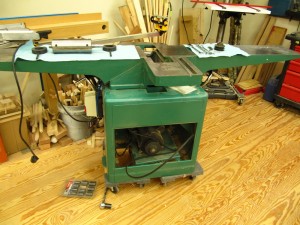
The installation was pretty easy.  As you can see below, pulling out the old cutter only required disconnecting the belts to the motor, pulling back the infeed and outfeed tables, and lifting the cutter assembly out of the unit.  The bearings were a bit of a struggle since they are a tight fit to the cutter shaft.  A wheel puller helped pull them off the old cutter and a couple of hardwood ‘tools’ and a hammer was all that I needed to install the bearings on the new cutter head.
Click to view large image.

Jointer, with old cutter removed. I lifted the jointer (all 400 lbs of it!) onto dollies so I could move it around during the rework.

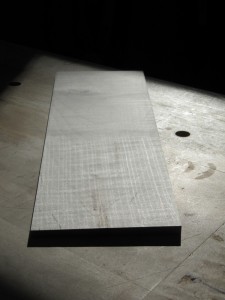
Here is the result of using the new cutter head on some reasonably figured maple.  The surface was very smooth although there are some burnish lines in the surface from the individual cutters.  There is no noticeable depth to the lines and a quick pass with 220 grit sander removed them entirely.  This maple always had SOME tearout with the previous cutter.  There is none with this cutter!
Click to view larger image.

Figured Hard Maple, after face jointing with 1/2 of it sanded to remove the burnish lines.


New Tool! Wide Belt Drum Sander

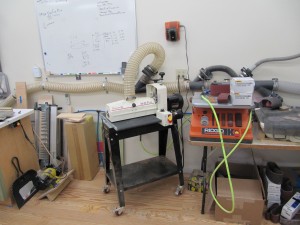
I’ve gotten a ‘new’ tool (new for me, it is ‘previously owned’), a wide belt drum sander!

Click to view larger image.

Drum Sander, installed along the Sanding Wall.

This sander is a Performax 16-32 Plus Drum sander.  It has a sanding drum that is 16 inches wide but, because one end is open, you can run a piece that it wider than 16 inches, presumably up to 32 inches wide!  I’ll have to do some fine tuning to achieve that, however, as the sanding belt installation needs to be perfect in order to sand a board that extends beyond the edge of the drum and not leave any tell tale marks.

I’ve tried a number of pieces through the sander, including a ‘surprise’ project.  Check it out:

DrumSander

[img src=https://tomstudwell.com/wordpress/wp-content/flagallery/drumsander/thumbs/thumbs_img_5083.jpg]9260Here is the Drum Sander installed along the 'Sanding Wall' and hooked into the dust collection system.
[img src=https://tomstudwell.com/wordpress/wp-content/flagallery/drumsander/thumbs/thumbs_img_5073.jpg]8850To test out the sander, I wanted to sand down some bandsaw cutoffs of Walnut.
I originally tried to plane these on the thickness planer. The one piece literally blew up! That was the incentive to look for a sander...
[img src=https://tomstudwell.com/wordpress/wp-content/flagallery/drumsander/thumbs/thumbs_img_5074.jpg]8680You can see the uneven thickness of the original piece.
[img src=https://tomstudwell.com/wordpress/wp-content/flagallery/drumsander/thumbs/thumbs_img_5075.jpg]8460Here they are after sanding with 36 grit (which was the grit installed on the sander when I got it).
[img src=https://tomstudwell.com/wordpress/wp-content/flagallery/drumsander/thumbs/thumbs_img_5078.jpg]8340This is after thinning down with 120 grit.
I learned that the drum sander cuts deeper trenches than normal sand paper and it took a lot more passes to remove the trenches from the 36 grit than I expected.
[img src=https://tomstudwell.com/wordpress/wp-content/flagallery/drumsander/thumbs/thumbs_img_5079.jpg]8240Next test was to try a small piece. This is a prototype key fob where the engraving wasn't very good and the piece was too thick anyway.
[img src=https://tomstudwell.com/wordpress/wp-content/flagallery/drumsander/thumbs/thumbs_img_5082.jpg]8180Sanded nicely to a usuable thickness so I can reclaim this stock for another fob!
[img src=https://tomstudwell.com/wordpress/wp-content/flagallery/drumsander/thumbs/thumbs_img_5098.jpg]8160Finally, looking for a 'real' project to use the sander, I made this Pizza Peel!
[img src=https://tomstudwell.com/wordpress/wp-content/flagallery/drumsander/thumbs/thumbs_img_5085.jpg]8100Boards glued up. You can see the sander in the background.
[img src=https://tomstudwell.com/wordpress/wp-content/flagallery/drumsander/thumbs/thumbs_img_5089.jpg]8020After running through the sander. PRETTY SWEET!

Click here to see more about the Pizza Peel project.


New Woodworking Project, Pizza Peel!

It was a synergistic week this week with the acquisition of a new tool (wide belt drum sander) and attending a “Pizza and Wine” class at Southern Season, which was very thoughtfully given to us by our daughter, Clare.

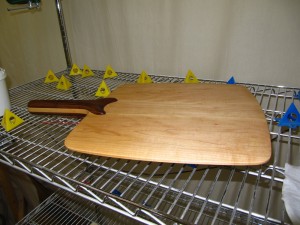
Needing to have ‘something’ that would use the new tool and inspired by the Pizza class, I decided that a Pizza Peel was JUST the right thing to make…

Whatcha think?

Click to view larger image.

Here’s the Pizza Peel, freshly oiled with Mineral Oil. It will get its first test in the kitchen tomorrow!

Here is the Peel in the making…

New woodturning class!

I attended a woodturning class at the local Woodcraft store.  This one was focused on spindle turning hollowed objects, such as, in this case, a lidded box turned from a single piece of wood.  The class was taught by Alan Leland, the instructor who taught a Woodturning Fundamentals course in January.  I like Alan’s work and he is a good instructor (proof is that he put up with me and actually taught me some things!).

We learned a lot and the culmination was making a lidded box out of Ash.  In my case, I wasn’t interested in making the intended subject matter more complicated than necessary so didn’t dwell on an ‘artistic’ design, but focused on the fundamentals to make a good box.  Here is the result…

Latest woodworking project

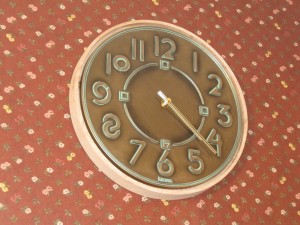
Just before Christmas, Kerry got a very nice clock based on a Frank Lloyd Wright ‘Exhibition’ design.  We liked the looks of the clock, but for the space it was in, we wished it was slightly larger diameter.  Also the face was about 3/8″ thick, but, due to the mechanism, protruded from the wall about 1 1/8″.

I decided to frame the clock and wanted to use a ‘shadow’ frame that was round like the clock.  After considering various ways of making a round frame (that was perfectly round since it had to match the clock), I decided to mill a frame from a single segmented piece.

Here is the ‘almost’ finished frame:

Frank Lloyd Wright Clock Frame

Here’s how it was done…

ClockFrame

[img src=https://tomstudwell.com/wordpress/wp-content/flagallery/clockframe/thumbs/thumbs_img_5008.jpg]3960Clock with frame, waiting to be finished.
[img src=https://tomstudwell.com/wordpress/wp-content/flagallery/clockframe/thumbs/thumbs_img_4949.jpg]3680It all started from a hunk of Red Oak from some slabs of a tree I had to cut down to build the workshop.
The wood has been seasoning for a little over a year and is 14 feet long, 10-12 wide, and 2 inches thick.
[img src=https://tomstudwell.com/wordpress/wp-content/flagallery/clockframe/thumbs/thumbs_img_4947.jpg]3500Here's a closeup of the chunk I cut out.
[img src=https://tomstudwell.com/wordpress/wp-content/flagallery/clockframe/thumbs/thumbs_img_4951.jpg]3460Here's the chunk on my jointer, ready to be flattened.
[img src=https://tomstudwell.com/wordpress/wp-content/flagallery/clockframe/thumbs/thumbs_img_4952.jpg]3400After flattening and letting it 'relax' for a few days, I marked the specific sections that will be used for the clock frame.
[img src=https://tomstudwell.com/wordpress/wp-content/flagallery/clockframe/thumbs/thumbs_img_4958.jpg]3370Since this chunk ended up quarter sawn, I decided to slice it so the exposed face would be quarter-sawn.
[img src=https://tomstudwell.com/wordpress/wp-content/flagallery/clockframe/thumbs/thumbs_img_4963.jpg]3350Close up of each section.
[img src=https://tomstudwell.com/wordpress/wp-content/flagallery/clockframe/thumbs/thumbs_img_4964.jpg]3330
[img src=https://tomstudwell.com/wordpress/wp-content/flagallery/clockframe/thumbs/thumbs_img_4965.jpg]3290
[img src=https://tomstudwell.com/wordpress/wp-content/flagallery/clockframe/thumbs/thumbs_img_4966.jpg]3290Close up of each section after ripping.
[img src=https://tomstudwell.com/wordpress/wp-content/flagallery/clockframe/thumbs/thumbs_img_4967.jpg]3290
[img src=https://tomstudwell.com/wordpress/wp-content/flagallery/clockframe/thumbs/thumbs_img_4968.jpg]3270
[img src=https://tomstudwell.com/wordpress/wp-content/flagallery/clockframe/thumbs/thumbs_img_4973.jpg]3260Then rejoined after putting the quartersawn face outward.
These give me 3 inch deep boards that can be cut into 30 degree wedges.
[img src=https://tomstudwell.com/wordpress/wp-content/flagallery/clockframe/thumbs/thumbs_img_4992.jpg]3280Here's the jig to precisely cut the 12 wedges.
[img src=https://tomstudwell.com/wordpress/wp-content/flagallery/clockframe/thumbs/thumbs_img_4994.jpg]3270All the wedges are glued into two halves.
Doing it in two halves allows any error (which is multiplied by 24 cuts) to be easily sanded out with a belt sander...
[img src=https://tomstudwell.com/wordpress/wp-content/flagallery/clockframe/thumbs/thumbs_img_4997.jpg]3250Finished glue up.
[img src=https://tomstudwell.com/wordpress/wp-content/flagallery/clockframe/thumbs/thumbs_img_4999.jpg]3270Disk has been flattened and planed down to the final thickness.
[img src=https://tomstudwell.com/wordpress/wp-content/flagallery/clockframe/thumbs/thumbs_img_5001.jpg]3320Then the piece is put on the CNC Router to precisely cut the pockets and outside cylinder.
[img src=https://tomstudwell.com/wordpress/wp-content/flagallery/clockframe/thumbs/thumbs_img_5002.jpg]3290The backing plate was also cut on the CNC router. The cutout in the middle exactly matches the back opening of the clock.
[img src=https://tomstudwell.com/wordpress/wp-content/flagallery/clockframe/thumbs/thumbs_img_5007.jpg]3270A couple more views...
[img src=https://tomstudwell.com/wordpress/wp-content/flagallery/clockframe/thumbs/thumbs_img_5009.jpg]3230
[img src=https://tomstudwell.com/wordpress/wp-content/flagallery/clockframe/thumbs/thumbs_img_5012.jpg]3170
WordPress theme: Kippis 1.12