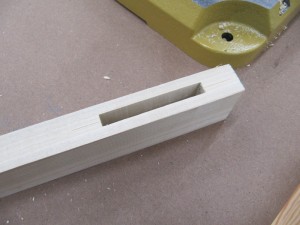
As part of completing the Workshop tool inventory, I’ve finally gotten a mortising tool. For those unfamiliar with this tool, it is a tool used to drill square holes and, when you put multiple square holes in a precise row, you get a nice rectangular hole, like this:
I tried a mortising tool years ago, but was disappointed with the results and returned the tool. It was a quality brand tool, but it didn’t cut very well – it took a lot of force to get it to drill into Cherry and, in fact, the handle shear pin broke in trying to use it. Since then I’ve learned that the Mortise Chisels that come with these tools are notoriously dull and need sharpening before you can use it – who’da guessed?
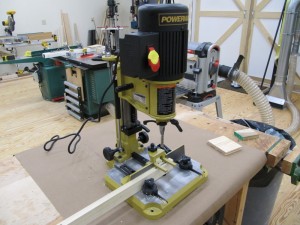
In researching for a new tool, my previous experience continued to nag at me and I decided that if I couldn’t get the best, there was no point in getting any. So, after reading several reviews, it was very clear that the only choice (for a bench top mortiser) was the Powermatic PM-701:
This little baby weighs 93lbs, being mostly cast iron, with a 3/4HP motor. This machine is solid!
There are several features that really stand out on this unit.
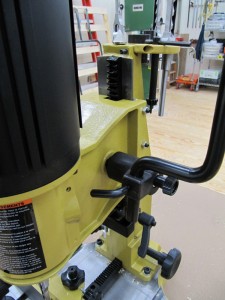
The critical part of any mortising tool. Any 'slop' in this area and you have a weak machine. With this tool you have high quality machined ways, adjustable gib (at three points) to take up any wear over time, rugged handle that can be moved for either left or right handed operation, large rack and pinion gear for moving the head up and down, and solid depth stop that reliably grips the post.
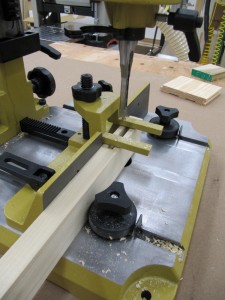
This tool has a solid cast iron base with a nicely machined cast iron fence that positions smoothly and has levers to rigidly lock it into position. The tool has a unique feature for accurately and quickly installing the mortising chisel. If you look at the larger image you’ll see, just under the collet, two plates that swing in between the chisel bushing and the collet when tightening the auger drill. Then they swing out of the way to position the chisel higher giving the necessary gap between the bottom of the chisel and auger bit – no ‘guessing’ at the gap. If you’re using a large chisel you would use both plates to provide a larger gap, but with chisels 1/2″ or smaller, only one plate is used.
Another feature that I like are the adjustable rollers to keep the workpiece against the fence. Most other Mortisers, if they provide anything, have either simple blocks or finger board type of pressure points. The rollers provide a nice reference point without creating unnecessary drag.
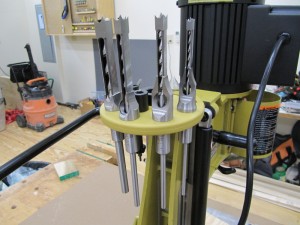
The tool has the requisite tool holder to hold chisels, bushings, and chuck key, but adds one additional feature, a sharpening cone to keep the bits sharp. As I pointed out above, the effort to cut a clean mortise is very dependent on keeping the chisels sharp. Very handy. Finally, the mortising chisels don’t come with the tool itself, something I found odd until I realized I probably wouldn’t trust ‘included’ bits after my last experience and would probably want to select a high quality set on my own anyway – which is exactly what I did. These chisels I bought from Lee Valley tools, are made in Japan, and appear to be very high quality. I also bought Lee Valley’s sharpening cone set, which includes a medium and fine grit cone. The cone included with the tool seems to be equivalent to the medium grit cone included with the Lee Valley set.
Overall I like this machine and pleased with my purchase. And, since I have a project coming up that requires over 50 mortises, I’ll have plenty of chance to test it!
Leave a Reply